For a research project (when I was working at the SmartSpace laboratory at HFU) I had to create photographs for the HTC Vive that should show the most possible variety in genres that could be achieved in the very tight timeframe (less than 7 days in rainy Bavarian and icy winter in the Black Forest).
The Problems
A standard camera (e.g. my Nikon D800) with a wide angle lens (I used the Nikkor 14-24mm f/2.8) will only capture an angle of 114° with one single shot. In virtual reality a viewer can move his head freely so he can frame all 360° in his viewport as well as to look up and down. Needless to say: A single shot photo simply won’t do. Photography and art can portray almost infinite numbers of varieties and scenarios. How can we ensure that the most relevant genres are considered in our study?
The Solutions
To enable a free choice of the viewport a panoramic capture of the scene is necessary. Because the viewer can frame all 360° in both directions a spherical panorama is needed (comparable with a globe or a ball). This image is then integrated in our 3D test scene that are shown to the viewers by mapping the photo to the inner surface of a giant sphere (“skydome”). Being all engineers and designers we are no experts in terms of fine art sciences. Although we found the quite interesting concept “Hierarchy of the Genres” – first introduced by André Félibien in 1669. He tried to develop a ranking of the different art genres, what does not seem very relevant for our endeavor, but to do so he had to list all categories of fine arts in order to rank them and this basic list is exactly what we need. The hierarchy:
- History
- Portrait
- Genre
- Landscape/Cityscape
- (Animal)
- Still life
With this basis we try to work out different photographic setups that could be compromise between a very traditional art perception and modern image content.
Panorama Capture – Tips and Tricks
Everyone who has at least tried to capture some stitched images with his smartphone will get to know the hassle of distorted parallax effects. Just have a look at this image I captured with the Google Nexus 5 and the onboard photo app:

Looks quite impressive for a smartphone snapshot, right? But if you look closer, you will notice a lot of errors: The biggest ones are the displacements at the columns (top right) and the false assemblage of the tiles in the very foreground.
The term “Nodal Point”
These effects happen, if the camera is not turned around its Cardinal Point. Unfortunately a simple tripod with a ball or three way head will NOT do. What you will need is a solution that is often called “nodal adapter” or “nodal point mounting”. At the moment there are only a hand full of alternatives available and they are all kind of expensive. Biggest problem is: I want to use my D800 DSLR with my wide-angle lens that is – even without additional handgrip – quite heavy.
Because I did not want to rely on some cheap far-east equipment (my experiences in macro photography have taught me a lot!) I found these mounting systems to fit my needs:
- Manfrotto 303SPH (Italy)
- Nodal Ninja NN6 F6001 (USA)
- Novoflex PRO II VR-System (Germany)
- Roundabout NP Deluxe (Germany)
All of these systems have their pros and cons. For example the little and fuzzy screws of the Novoflex version are a big drawback. The Nodal Ninja looks quite labile. The Manfrotto is simply too expensive in Germany and the Roundabout does not have a nadir-solution (see later). Personally I decided to go with the Roundabout because it is a little manufacturer from Bavaria that offers German quality yet it is the cheapest of all four systems. Also it has a nice lever at the side to switch the elevation angles quick and easily. (You will do this quite often if you do not shoot with fisheye lenses.)
The Setup
You will have to setup your nodal head to turn around straight through the camera’s vertical axis. Also to find out the Cardial point (from now on I will call this also “Nodal Point” although the term is not scientifically correct) you will have to do some tests.
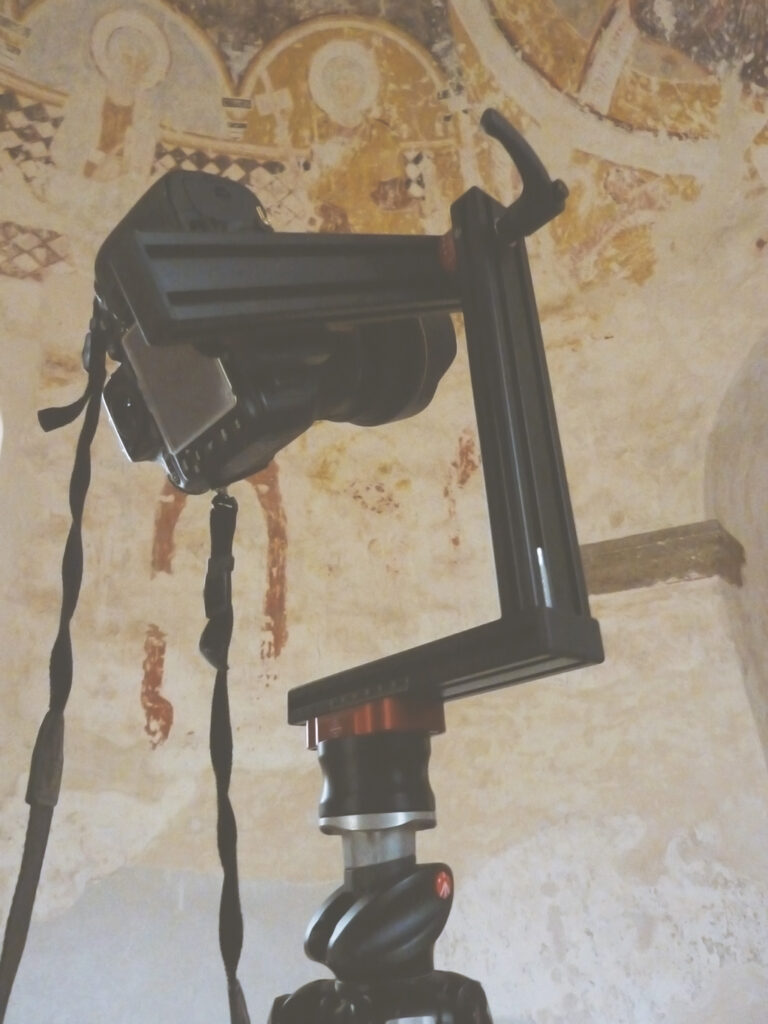
If you also shoot will the Roundabout NP with the Nikon D800 (or D800e, D810, D810a, D850) and the Nikkor 14-24mm f/2.8 lens at 24mm you can simply use my setup here:

My inner perfectionist (I am still German, you won’t get rid of your heritage) is pleased that the Nikon D800 camera goes very well with the horizontal shift: A straight 50mm on the scale will certainly do (see left image).
For the use of the wide angle lens on 24mm I’ll go with 125mm (right image) what eliminates all parallax effects efficiently. Please be aware that you will need to adjust this setting if you change your focal length or your lens completely. If you always use the same camera you will never have to touch the settings on the first image ever again. (To save weight I did not use my battery grip on the camera. Also the Roundabout adapter is too small for this setup.)
Shooting Setup
All of the exposures (that actually worked) were done with this setup (Actually the individual frames were overlapping for the stitching process. I just exaggerated the graphics for a better overview):

All in all I took a total of 28 exposures which were distributed as follows:
- 1 exposure for the Zenith (pointing +90° up)
- 12 exposures pointing +30° up (based from the horizon )
- 12 exposures pointing -30° down
- 3 exposures for the Nadir (pointing -90° down), see later why this is relevant
For the two rounds with 12 exposures I turned the camera around the vertical axis (“YAW”) in 30° steps and used the camera in portrait mode.

In the wild my setup looked like this (Nikon D800, Nikkor 14-24, Roundabout NP, Manfrotto tripod):
Some locations had too large dynamic range values that I had to shoot “true” 32 bit HDR pictures. To do so, every exposure is a combination of up to nine individual photos that were taken with the D800’s bracketing mode. (-2.5 EV / -2.0 EV / -1.5EV / -1.0EV / ±0.0EV / +1.0EV / + 1.5EV / + 2.0 EV / +2.5 EV)
Color Calibration
To ensure that the captured pictures really frame the correct color at the place a calibration method is needed. My solution for this complex problem:
- I shoot in full manual mode without switching the settings within one panorama shooting cycle
- I shoot in 14 bit RAW (in my case, I use the Nikon NEF-format, not Adobe’s DNG), so I am able to correct the color temperature in post production
- I place a Spyder CUBE in my setup and I ensure that one picture has the CUBE in it, so I can use it to determine the correct white balance, color temperature, black point, etc. and apply these values to all pictures of the capture cycle.

The CUBE is basically an upgraded gray card: It features also a “black trap” (a hole inside where you can measure the darkest details in your picture) and a chrome covered ball at the top in order to get a feeling of the occurring reflections. It has also a nice little mount to attach it on all tripods, what I did for some of the captures. All in all it is a nice little tool, but a little too overpriced for a plastic cube.
Result
For a quick demonstration, here is the final equirectangular panorama of the “Genre”-scene.1 Please note: loading the panorama will use up to 4,4 MB. The image here features a very limited resolution of 4000 x 2000 px in order to limit the loading times. The original image has a significantly larger resolution and quality.
Footnotes
- This scene was shot inside the “Karner Perschen“, a historic landmark in Upper Palatinate (Bavaria). ↩︎