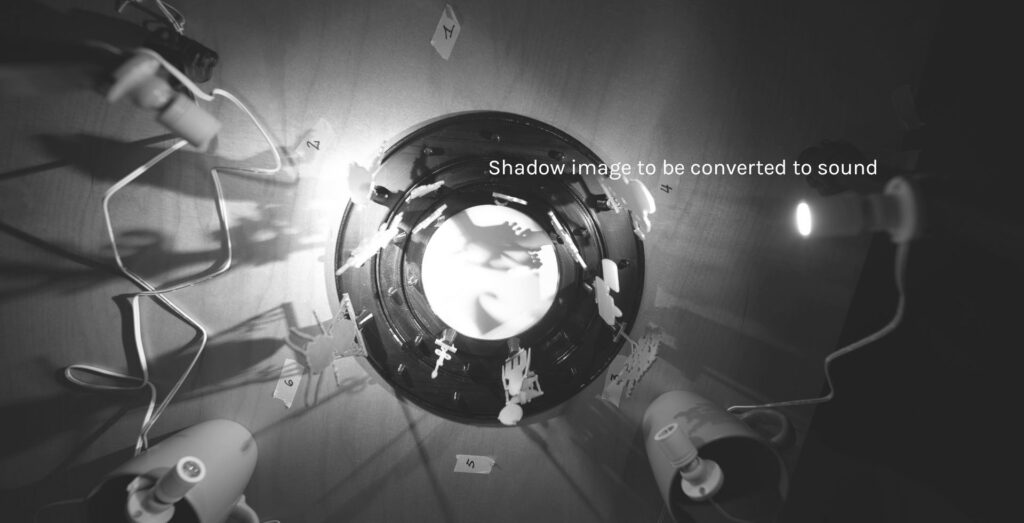
For the WLM art project that I am working on in cooperation with Michael Johansson, I want to use the output of the shadow machine as a musical instrument. In concrete terms, the idea is to have the shadow images projected in the center of the tableau transformed into sounds in real time.
For this purpose, the ancient technology MIDI is used, a protocol that can be used to control synthesizers, electric pianos and groove boxes. A MIDI message looks something like this (in reality it is A LOT more complicated, but it is not neccessary to dig into this):
NoteOn 1 48 106If this command were sent to an electric piano, it would result in a “C” with medium velocity. NoteOn means that a key is to be pressed. The 1 stands for the channel (= you could daisy chain several MIDI instruments together and each instrument “listens” to only one assigned channel), the 48 triggers the note itself with a velocity of 106 (range: 0 to 127). If the key is to be released, a corresponding command is needed:
NoteOff 1 48 106If this NoteOff command is not sent the note that was triggered by the NoteOn will be played forever. So each NoteOn demands a corresponding NoteOff at some point. It all seems a bit antiquated, but also pretty straight forward. But how do we convert the shadow images into MIDI control signals? For this I wrote a Processing script, which is terribly hacky, but serves its purpose (You can find my spaghetti code in the addendum of this post. So scroll down, if you want to skip the explanations.). As a proof of concept this script does the following:
- It reads the color values of the pixel from the very center of the image.
- It determines the average color value from an imaginary line that runs from the center of the camera image to the top. (this function imitates the needle of a “record player”)
This means that if the shadow image changes by altering the configuration of the wandering landscape machine, the pixel values will change.
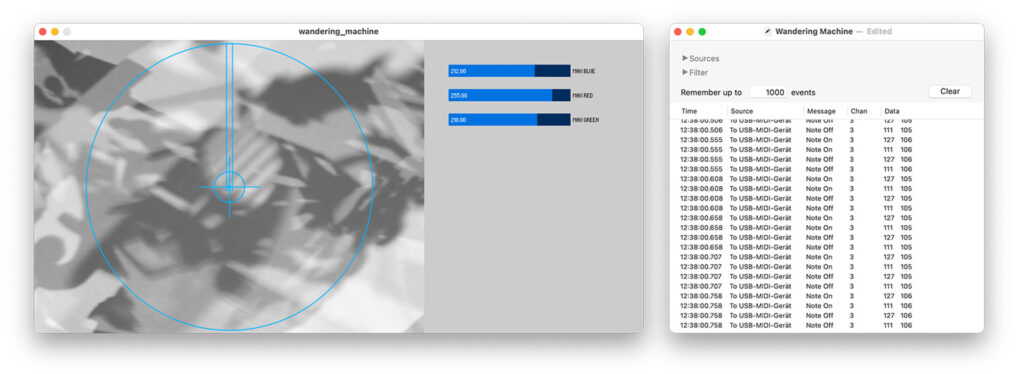
To implement the camera library processing.video is used. This also reliably finds the Elgato Streamcam, which I want to use for this purpose. By using the get command and specifying the x and y coordinates (color c2 = get(cam.width/2, cam.height/2);) it is fairly easy to extract the color value in the middle of the live video. An array and a for loop take care of the “record player” requirement, i.e. averaging the pixel color values within a imaginary line from the center to the top.
I experimented with a small GUI for centering the camera to the shadow tableau and displaying where the color values are read in each frame. But ultimately I got rid of this experiment due to performance issues. (I will need to look into this in the future.)
Problem 1: Java uses a really weird system for color values – e.g. when the variable c2 is printed to the console, I get values that look something like this (yes, that’s a minus in front of each value):
-11519434
-11519448
-11519431
For a better usability I output the colors as color channel extracts in the value range from 0 to 255. This can easily be done with the following functions:
float c2red = red(c2); // red values
float c2green = green(c2); // green values
float c2blue = blue(c2); // blue values
Works fine. However, since the MIDI protocoll demands values from 0 to 127 for each command, but the RGB ranges between 0 and 255, these numbers still need to be adjusted. This is done using the map function:
float c2redMapped = map(c2red, 0, 255, 0, 127);Naturally this produces odd decimal values. Since these cannot be used as MIDI commands, they still have to be converted to integers:
int c2redMIDI = int(c2redMapped);Now it is possible to use these values. To enable Processing to send MIDI to the outer world, I use the library themidibus. First you have to tell themidibus the name of the hardware interface you want to use:
myBus = new MidiBus(this, "$Name", "$Name");Personally I use a “Swissonic USB MIDI Interface” that I bought very cheaply some years ago.

Specifically, we need to find out what to use instead of $Name. To do this, we let the console output all detected MIDI devices:
MidiBus.list();🤖 Attention: MIDI is quite an ancient protocol. Accordingly, the devices are sometimes named cryptically (and in my case with umlauts that Processing does no recognize). I strongly recommend to use copy and paste from the console output here. For example, my device was only recognized if there were two (!) spaces behind the name (where normally a German umlaut would have been). So instead of USB-MIDI-Gerät I have to write USB-MIDI-Ger .
myBus = new MidiBus(this, "USB-MIDI-Ger ", "USB-MIDI-Ger ");Once all this is done we can use
myBus.sendNoteOn($Channel, $Pitch, $Velocity);
myBus.sendNoteOff($Channel, $Pitch, $Velocity);
to send MIDI controls out of my laptop to the USB-Interface. In doing so, we need to replace $Channel, $Pitch and $Velocity with the mapped color values rounded to integers, e.g. like this:
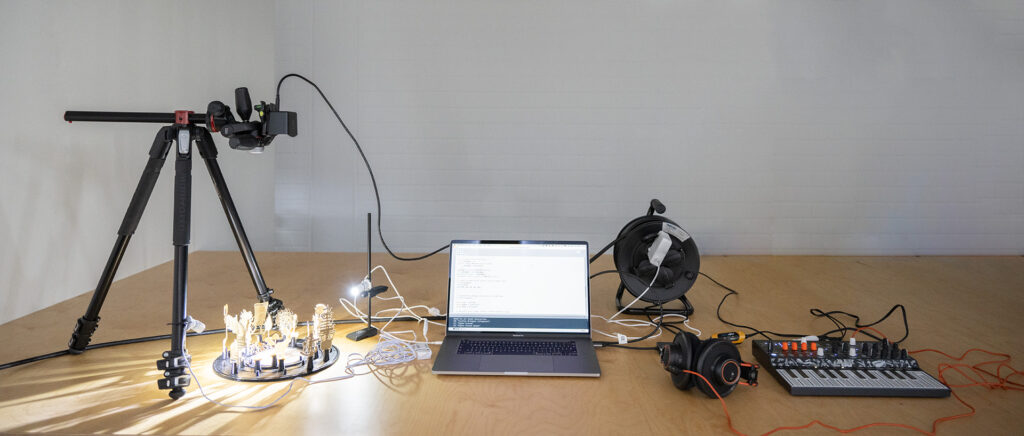
myBus.sendNoteOn(1, c2redMIDI, c2blueMIDI);I did this as a test setup with the Arturia Microfreak as receiver of these MIDI commands. That means, that a camera is actually in control of this synthesizer (and produces horrible sounds at the moment). From now on, my job will be to tinker the code in order to force this setup to produce somewhat “pleasant” sounds.


Different Approach
I’m not entirely convinced that the Arturia Microfreak is the right hardware synthesizer for this particular use case. The Landscape Wandering Machine requires more ‘ethereal’ sounds that lean towards either ‘ether’ or ‘drone’ vibes. However, the Microfreak lacks an integrated FX unit that could modify its harsh sounds.
In my studio, I’ve therefore experimented by connecting the Microfreak to an older (production date: 1988!) 16-inch Alesis Midiverb II, and I was genuinely thrilled by the significantly more interesting soundscapes it produced. The Midiverb really brings out a lot from the Microfreak!
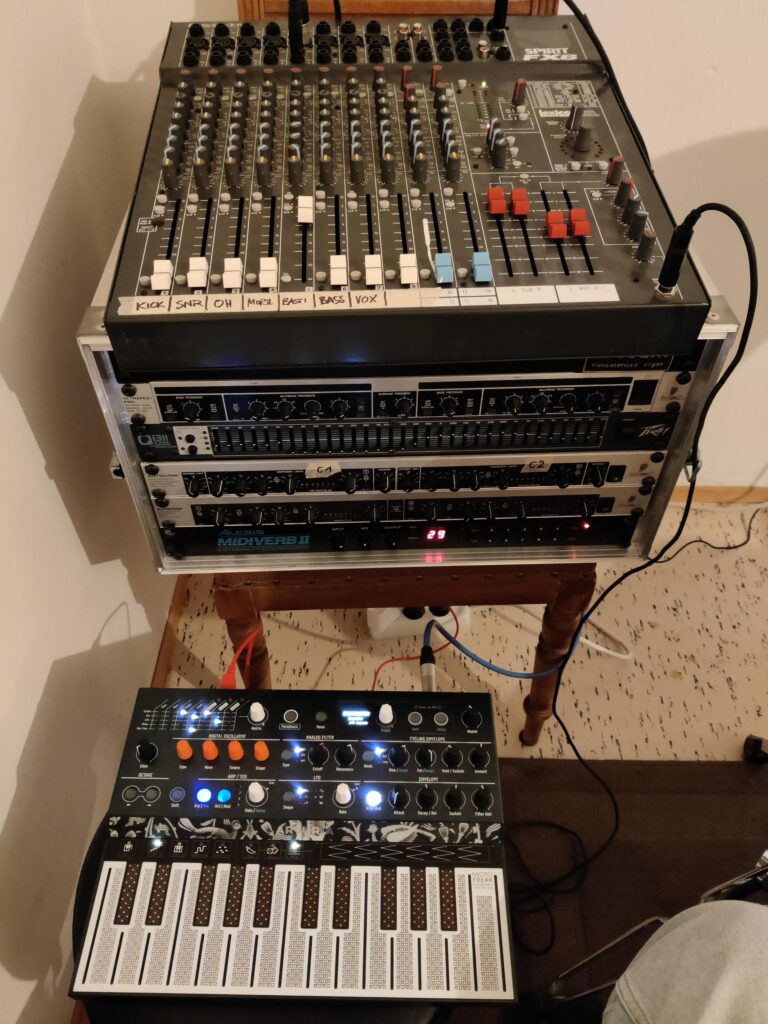
The Microfreak using the Alesis Midiverb II (bottom row in the rack)
👉 BUT: The Midiverb transforms the Microfreak into a fantastic ‘Ambient’ or ‘Ether’ synthesizer. Yet, it doesn’t quite reach into the ‘Drone’ territory with its soundscapes. For this reason, I’m currently experimenting with the LIRA-8 VST plugin (available for free or for a small fee on Gumroad!), which was specifically designed to create ‘Drones’. Since this software is only offered as a VST or a PureData blueprint, I decided to try out the VST version. The problem is, I don’t necessarily want to run a full DAW like Cubase or Logic in the background just to operate a single VST.
That’s why I’m thrilled to have discovered Pedalboard 2, an open source tool that provides a very comfortable interface for Windows and Mac to run a VST in ‘standalone’ mode.

The best part: Pedalboard 2 allows working with MIDI commands but can also be controlled via OSC. I plan to spend some time adjusting the Processing patch accordingly. I also haven’t tested yet whether Pedalboard 2 runs smoothly on my Mac. (see below) I’m also somewhat concerned about the relatively high CPU usage that Pedalboard 2, in conjunction with LIRA-8, is causing on my Windows PC.
Getting it to run on OS X
Although Pedalboard 2 offers a version for Mac, the software is no longer compatible with newer versions of OS X. For this reason, I started looking for an alternative and found something directly from Apple: Apple AU Lab (scroll to the bottom of the page). This software is available for free, but it requires significantly more configuration effort to be used effectively. A good guide for setting this software up to receive internal MIDI commands can be found here. (Maybe this is also an alternative to AU Lab, but I haven’t tested it yet: Hosting AU.) In order to use LIRA-8 in AU Lab it is neccessary that the file *.component (= the AU of LIRA-8) is placed in the folder /Library/Audio/Plug-Ins/Components. (Finder ➡ Go to). See also this article by Apple. Also the IAC bus needs to be enabled in the Audio and MIDI settings panel.
Once the configuration of AU Lab is done, the Processing code needs to be tweaked in order to find this new MIDI device. If I prompt MidiBus to list all MIDI devices a new device called Bus 1 appears which can be used as input and output device. With this configuration it is possible to send MIDI commands to AU Lab via Processing:
myBus = new MidiBus(this, "Bus 1", "Bus 1");The CPU load remains OK: Once AU Lab with LIRA-8 and Processing with full MIDI and camera support is running the overall CPU load remains quite constantly on 35%. (Not good, not terrible – needs some optimization in the future. Note: I am still using an Intel i9 Mac at the moment – I haven’t tested my project on an Apple Silicon yet.)
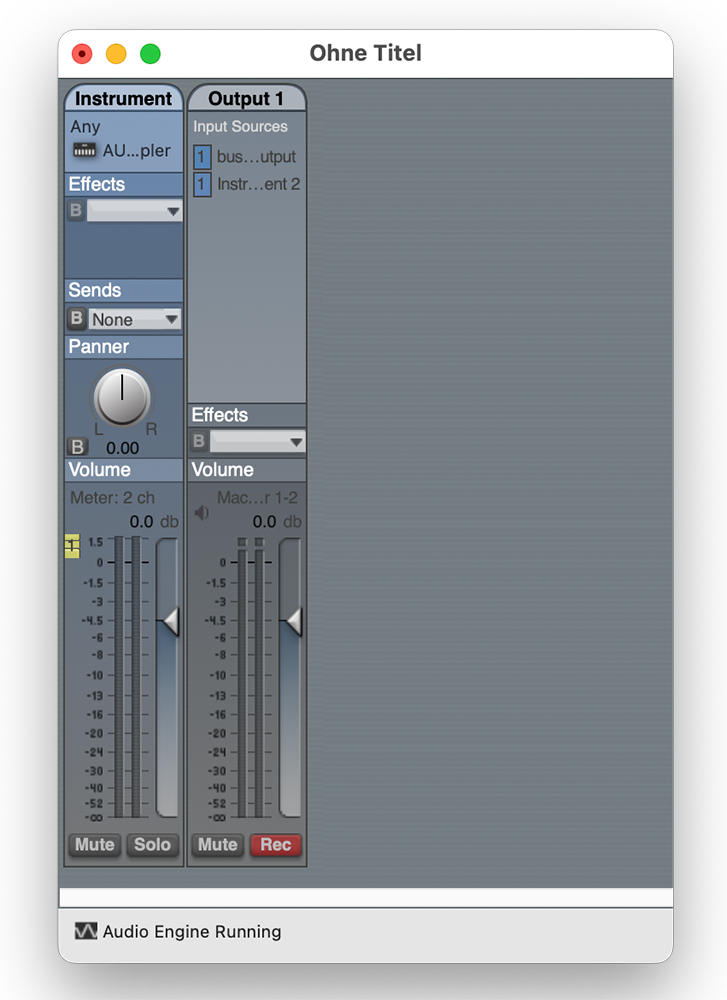
The very basic configuration of AU Lab in order to receive MIDI commands via the IAC driver/IAC bus.
Implementing FX
As I’ve mentioned before, the Microfreak greatly benefits from some added reverb and delay. Since the LIRA-8 is used as a VST (or as an AU in the case of OS X), there’s the advantage that regular VST plugins for effects can now be utilized as well. As a quick proof of concept, I’ve employed the excellent reverb plugin OrilRiver by Denis Tihanov in my setup. The CPU load remains manageable, and integration via Pedalboard is not an issue at all.

Despite the ‘Drone’-qualities of the LIRA-8 I was not fully satisfied with the results. Granted, they sounded interesting and uneasy but also not particularly pleasant. Hence, I searched for another VST synth that is capable of producing interesting, yet also more ‘mainstreamy’ sounds. I finally found a hot candidate being ‘Helm’ by Matt Tytel (link here), which in combination with the OrilRiver sounds amazing.
For this demo I used a heavily modified preset from ‘Helm’ called ‘MT Stuttering Organ’, although I bypassed the delay and reverb effects from Helm and fed the vanilla audio into OrilRiver.

The ‘Helm’ in VST-mode with the modified preset I used for the demo. With this setup it is possible that the WLM-MIDI output only produces a MIDI-command every 4 seconds (alternatively every 2 seconds for halftime), so I can reduce the framerate in the video feed quite a bit. (Alternative: implement a delay(4000); after each NoteOff command.)
(Maybe) Useful Links
- The MIDIbus library: Link
- MIDI monitor, a nice Mac app that lists all MIDI commands that are sent/received in real time: Link
- The Arturia Microfreak, the small hardware synthesizer that is used in this experiment: Link (Link to the German manual)
- VCV Rack, a software “Eurorack Synthesizer” that was used before the Microfreak arrived: Link
- MIDI Kompendium: Link (German)
- 🐱 Very high recommendation: The chapter about MIDI in the Introduction to Computer Music from Indiana University: Link
Stuff I want to look into in the future
- a MIDI synthesizer/playback tool made in Processing 3/4: Link
- If I consider a rewrite in Python I should look in Pedalboard (from Spotify) for using VST or AU plugins in Python (not to be mistaken with ‘Pedalboard 2’ – i.e. the tool I used above for using VSTs as ‘standalone’ devices.
Addendum
Below you find the whole Processing script as of today (February 13th, 2023). This script is 100% work in progress and still in heavy development (i.e. I tinker with it until something falls apart). Use it on your own risk.
import processing.video.*; // camera lib
import themidibus.*; // MIDI lib
MidiBus myBus; // The MidiBus
Capture cam;
void setup() {
size(640, 480);
cam = new Capture(this, 640, 480, 5);
cam.start();
MidiBus.list();
myBus = new MidiBus(this, "USB-MIDI-Ger ", "USB-MIDI-Ger ");
}
void draw() {
if(cam.available()) {
cam.read();
}
image(cam, 0,0);
// get color at center of image
// todo: could be replaced with Record[cam.height/2] etc.
color c2 = get(cam.width/2, cam.height/2);
// get color in line from middle to top
// "record-player-approach"
// initialize array
int[] Record = new int[int(cam.height/2)];
for(int i = 0; i<cam.height/2; i++){
color c1 = get(cam.width/2, i);
// extract only red color channel
float redArray = red(c1);
// map color value range to MIDI parameter range
map(redArray, 0, 255, 0, 127);
// cast float into int
int redRecord = int(redArray);
// write current value into array
Record[i] = redRecord;
}
// calculate average of array
float average = 0;
for(int j=0; j<Record.length; j++){
average += Record[j];
}
average /= (float)(Record.length);
int average2 = int(average);
// draw rectangle with current array average color
fill(average2);
stroke(255);
rect(20, 20, 40, 40, 20);
// convert the strange java colors to something more readable
float red = red(c2);
float green = green(c2);
float blue = blue(c2);
// map each color range (0-255) to MIDI parameter range & convert to int
int MIDIred = int(map(red, 0, 255, 0, 127));
int MIDIgreen = int(map(green, 0, 255, 0, 127));
int MIDIblue = int(map(blue, 0, 255, 0, 127));
int channel = 2; // seems to send on channel+1; dont't know why
myBus.sendNoteOn(channel, MIDIred, MIDIblue);
delay(50);
myBus.sendNoteOff(channel, MIDIred, MIDIblue);
}
void delay(int time) {
int current = millis();
while (millis () < current+time) Thread.yield();
}